
Previously we outlined how to create the SSIS packages for ODE to load data into staging tables as a part of the table load. The steps were defined explicitly for use with BimlStudio which is a paid product from Varigence, but if you planning on doing things in a more restrained fiscal manner then you’ll using BimlExpress which is the free download for Visual Studio. There is a third option which could be used which is BimlOnline – a cloud development studio (currently in Beta) – hopefully a future blog will expand on the use of this – at the moment we have yet to evaluate/investigate it for use in the SSIS package generation process.
Anyway onto using BimlExpress – downloading and installing it into Visual Studio should be pretty straight forward so I’m not going to detail that here, what I will outline in the following steps is how to go through creating an SSIS package project and packages ready for deployment to Integration Services Catalog on SQL Server. I will be repeating most of the steps detailed in the post (SSIS Packages Data Load Type) by Kate, but with obvious changes for the BimlExpress approach.
Step 1 – Get Visual Studio up and running
One good way to make sure that you’ve got BIMLExpress installed is the presence of its eponymous Menu bar item. If you haven’t obtained a free license key during the installation process, then now would be a good time to request one (pretty simple – supply an email address and wait).

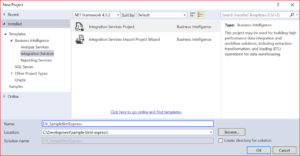
Step 2 – Create an SSIS package project and configure appropriately
Make sure that the project name matches the package_project variable value you have provided when you configured the connection in the ODE_Config database.
This should be pretty straightforward, but there are some interesting things that can happen. First off try and stick to one Solution : one Project – I have experimented with having multiple SSIS package projects in a single solution, but for some reason the BimlExpress compiler got rather confused over which Biml files it was supposed to use, even though they were clearly separated in different project file folders.
Unlike the example presented for the BimlStudio we won’t have the luxury of a separate process to generate all of the desired configuration settings, so lets set things up now.
- Remove the sample Package.dtsx from the project as we don’t need it.
- Configure the following properties for the project: ProtectionLevel = DontSaveSensitive, TargetVersion = SQL Server 2016
I haven’t mentioned configuring the Deployment options for the project here, as I’m following the same sequence as for the BIMLStudio instructions and we do that near the end.
Step 3 – Incorporate BIMLScripts and customise
Add all four BIMLScript files to the project (use the Add Existing Item… option for the project ), you can find them in the folder “BIMLScripts” in the ODE project folder you have downloaded from GitHub.
Edit the first BIML file called _Include_10.biml.
- Put the source system name you have configured for this source (SourceSystemName). You should have created a source system with this name on the preparatory stage and have already used in the ensemble creation script.
- Put in a table name for the next variable (TableName) or leave it set to “ALL”. BimlExpress will generate an SSIS package for all the source tables configured for this source, or provide the option to re-generate it if it already exists. In the case where SSIS packages are required to be generated for a specific list of tables, e.g. for additional freshly configured tables, provide a comma separated list of tables in this parameter.
- Put in the connection string for the ODE_Config database (MetadataConnection). This is where BimlExpress will get the metadata to generate the packages from.
- Ignore the packageProjectNamePrecursor variable as this is used by BimlStudio to generate the Package Project name – which you’ve already done in creating the Visual Studio project, and isn’t used by BimlExpress.
Save the changes and get ready for automagical package generation.
Step 4 – Generate SSIS packages for the Project.
When using BIMLExpress in Visual Studio execution of the scripts is fairly straight forward. Simply select the 10_Environments.biml and the 20_Build.biml files in the Solution Explorer and right-click. From the short-cut menu you have the option to Generate SSIS Packages or Check Biml for Errors. Its always a good idea to check for errors after you make any changes to the scripts, but you can go ahead and generate the SSIS packages and you should see a collection of (expected) packages to appear in the Solution Explorer.
At this point you’re pretty much done, all that is left to do is deploy the Project and it’s packages to the Integration Services catalog on your server. Create a folder with exactly the same name you have provided for the package_folder variable for the connection entry in ODE_Config. In our previous post example it was “Vault_External_Source”. From the Visual Studio, deploy the project into this folder. To do that, right-click on the project in the Solution explorer, choose “Deploy”. Provide a server name and select the folder.
After a successful deployment the Project and it’s package should appear in the Integration Services Catalog on the database server. From here on the remainder of the process is exactly the same as detailed in (SSIS Packages Data Load Type).
Until de next de time – bork, bork, bork.
Varigence®, Biml®, BimlScript™, Mist® and Vivid® are proprietary marks of Varigence.
