I think we can all agree that it is nice to get things for free when we can, and so I thought of this post about how to set up your local development machine to run U-SQL jobs for development and ad-hoc purposes rather than submitting them to Azure Data Lake Services and paying for each run.
Getting Setup
If you’ve been following these blogs and/or playing with U-SQL scripting you should have most of the tools required, but just to be on the safe side here’s a summary of what will be required:
- Visual Studio: All editions except Express are supported.
- Visual Studio 2017
- Visual Studio 2015
- Visual Studio 2013
- Microsoft Azure SDK for .NET version 2.7.1 or later. Install it by using the Web platform installer.
- Download and install Azure Data Lake Tools for Visual Studio from the Download Center. After installation, note that:
- The Server Explorer > Azure node contains a Data Lake Analytics node.
- The Tools menu has a Data Lake item.
Data Root Folder
The data-root folder is a “local store” for the local compute account. It’s equivalent to the Azure Data Lake Store account of a Data Lake Analytics account. Switching to a different data-root folder is just like switching to a different store account. If you want to access commonly shared data with different data-root folders, you must use absolute paths in your scripts. Or, create file system symbolic links (for example, mklink on NTFS) under the data-root folder to point to the shared data.
You can use both a relative path and a local absolute path in U-SQL scripts. The relative path is relative to the specified data-root folder path. It’s recommended that you use “/” as the path separator to make your scripts compatible with the server side. Here are some examples of relative paths and their equivalent absolute paths. In these examples, C:LocalRunDataRoot is the data-root folder.
Relative pathAbsolute path/abc/def/input.csvC:LocalRunDataRootabcdefinput.csvabc/def/input.csvC:LocalRunDataRootabcdefinput.csvD:/abc/def/input.csvD:abcdefinput.csv
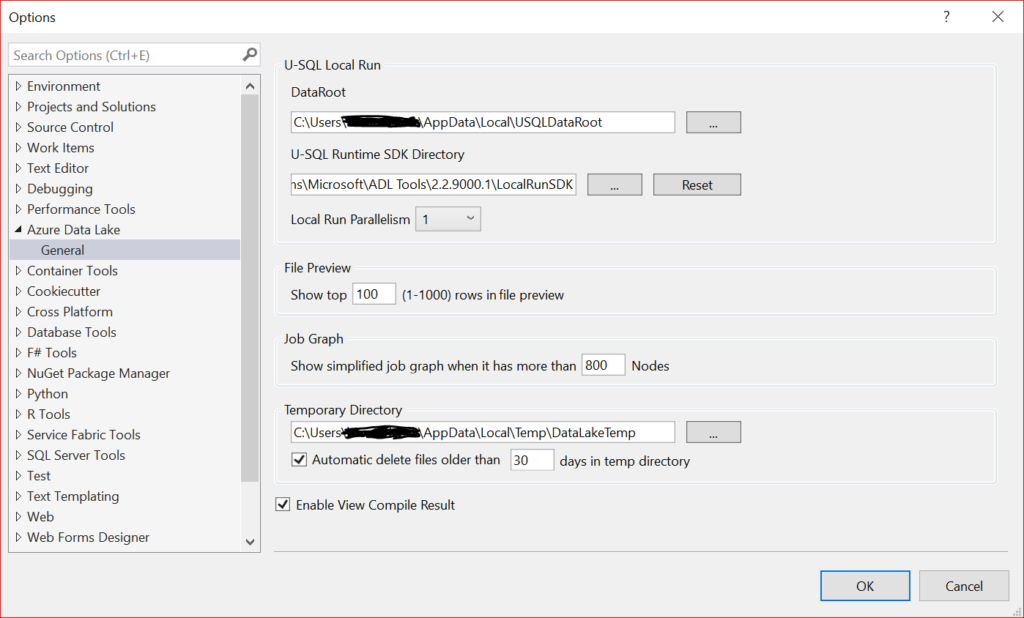
If you want to see where the data root folder value is stored in Visual Studio then
- Open Visual Studio.
- Open Server Explorer.
- Expand Azure > Data Lake Analytics.
- Click the Tools menu, and then click Options and Settings.
- In the left tree, expand Azure Data Lake, and then expand General.

Note that a Visual Studio U-SQL project is required for performing local run. This part is different from running U-SQL scripts from Azure which quite happily can be run by themselves.
To run a U-SQL script locally
- From Visual Studio, open your U-SQL project.
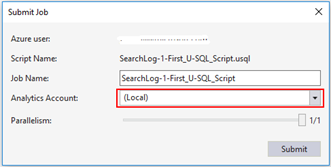
- Right-click a U-SQL script in Solution Explorer, and then click Submit Script.
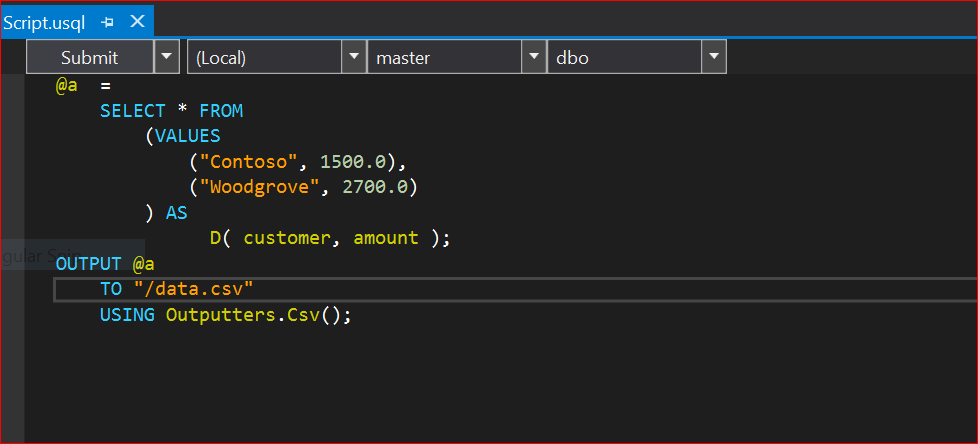
- Select (Local) as the Analytics account to run your script locally. You can also click the (Local) account on the top of script window, and then click Submit (or use the Ctrl + F5 keyboard shortcut).

This can also be done from the script editor itself (see below screenshot) by selecting the (Local) server.

Sample locations
If you want to download some of the sample scripts from the ADLA portal to use locally it’s very simple. Choose your desired script from Overview > Sample Scripts and then use Save As to save locally.
Another source is git hub – which has Azure Data Lake Analytics samples along with a massive collection of other samples for all things Azure.
Export a U-SQL database
If you’ve got a U-SQL database up in the Azure data lake and you want to bring down a local copy for development purposes then this article from Microsoft shows just how to go about it. But as the article states – if you’re bringing down data as well as database entities then you may be facing a cost. Of course, once it’s local go nuts.
U-SQL Resources
I realize that so far I’ve been going on about setting up your local environment to let you do all sorts of U-SQL goody goodness, but without any further info on U-SQL and what you can do. Well rather than turn this into a U-SQL primer (and the internet already has plenty of those) here are a collection of links to some handy resources:
- Get started with U-SQL – This is part of the Microsoft documentation on Azure Data Lake Lakes and has some handy tutorials to work through.
- U-SQL Tutorial – This is a draft gitbook about U-SQL which should give a good foundation.
- U-SQL Language Reference – This is the big daddy of resources with pretty much anything you wanted to know about U-SQL.
- Stairway to U-SQL – This is one of SQLServerCentral’s great stairway series which breaks down the learning into a nice easy sequence of steps.
- Microsoft Developer Blog – The horses … err … mouth.
- GitHub Site – Lots of examples of the many, many things you can do with U-SQL.
Things to consider for when you bring the ball back
So you’ve finished your local development and now want to upload your scripts and/or database to Azure to go play with the big kids. The following advice will hopefully minimize the amount of tweaking and rework you’ll need to do when going back to ADLA in the cloud.
Paths
Reiterating what has been mentioned above in the Data Root folder section. It’s recommended that you use “/” as the path separator to make your scripts compatible with the server side, and it would be a good idea to use relative paths rather than absolute paths.
Parameterization
This is a good way to set up a script so that you can apply it to different situations. This is a simple example of how to parameterize your script – its taken from a Microsoft blog that extends the concept and shows how to use Azure Powershell to supply the parameters externally to the U-SQL script when it is executed.
Here’s the original script prior to adding in parameters:
@searchlog = EXTRACT UserId int,
Start DateTime,
Department string,
Query string,
Duration int,
Urls string,
ClickedUrls string
FROM "/Input/input.tsv"
USING Extractors.Tsv();
@searchlogFiltered = SELECT *
FROM @searchlog
WHERE Department == "Finance"
AND Duration >= 5;
OUTPUT @searchlogFiltered
TO "/Output/output.tsv"
USING Outputters.Tsv();
Now we add in parameters for @Department, @Duration, and @StartDateTime, along with some default values (by using the DECLARE EXTERNAL keywords). We also move the input and output paths into their own variables.
DECLARE EXTERNAL @Department string = "Finance";
DECLARE EXTERNAL @Duration int = 2;
DECLARE EXTERNAL @StartDateTime DateTime = new DateTime(2017, 10, 1, 0, 0, 0, 0);
DECLARE @input string = "/Input/input.tsv";
DECLARE @output string = "/Output/output.tsv";
@searchlog = EXTRACT UserId int,
Start DateTime,
Department string,
Query string,
Duration int,
Urls string,
ClickedUrls string
FROM @input
USING Extractors.Tsv();
@searchlogFiltered = SELECT *
FROM @searchlog
WHERE Department == @Department
AND Duration >= @Duration
AND Start >= @StartDateTime;
OUTPUT @searchlogFiltered
TO @output
USING Outputters.Tsv();
Migrating the database
This is the same process as detailed in the Export a U-SQL Database section above, except that you’re exporting the local database (make sure you do it from the Server Explorer and not the Cloud Explorer – both let you see your databases, but only the Server Explorer will give you the option to export). After that, it’s simply a matter of uploading the exported resources to the Azure Data Lake Store of the desired ADLA and submitting the U-SQL script.
Hopefully, this article has given you further help and hints for working with U-SQL and Azure Data Lake Analytics.
Until de next de time, bork, bork, bork.
– Brent


