
Following on from my previous blog this is where things get harder, well more typing and less clicking anyway. The next piece of the puzzle is, if I deploy something bespoke on Apache can I secure it? I found two guides for installing Shibboleth, there is one on the Gluu website but I mostly followed this blog which I felt was much more detailed.
Prerequisites for this are:
- AWS EC2 with Ubuntu installed a T2.micro instance is sufficient.
- Gluu Server installed on another server
Installing Shibboleth on Apache:
ssh to your new web server and then perform the following commands to install Apache, Shibboleth, and some self-signed SSL certificates
sudo su
apt-get install apache2
apt-get install libapache2-mod-shib2
openssl req -x509 -nodes -days 365 -newkey rsa:2048 -keyout /etc/ssl/private/sp.yourdomain.com.key -out /etc/ssl/certs/sp.yourdomain.com.crt
Here are the values I used when generating the SSL certificate:
Country Name (2 letter code) [AU]:NZ
State or Province Name (full name) [Some-State]:
Locality Name (eg, city) []:Wellington
Organization Name (eg, company) [Internet Widgits Pty Ltd]:OptimalBI
Organizational Unit Name (eg, section) []:
Common Name (e.g. server FQDN or YOUR name) []:sp.yourdomain.com
Email Address []:ben.lee@optimalbi.com
Create the following file /etc/apache2/sites-available/sp.yourdomain.com.conf and insert the following text
<VirtualHost *:443>
ServerName sp.yourdomain.com
ServerAdmin youractual@email.address
DocumentRoot /var/www/html
SSLEngine on
SSLCertificateFile /etc/ssl/certs/sp.yourdomain.com.crt
SSLCertificateKeyFile /etc/ssl/private/sp.yourdomain.com.key
# If you have an intermediate certificate from an SSL provider, you can specify it here
# SSLCertificateChainFile /etc/ssl/certs/your-ssl-authority-intermediate.crt
</VirtualHost>
Next run the following commands
a2enmod ssl
a2ensite sp.yourdomain.com
service apache2 restart
mkdir /var/www/html/auth
echo "<html><body>logged in</body></html>" >/var/www/html/auth/index.html
chown -R www-data:www-data /var/www/html/auth
Test your website works at this time https://<webserver IP address>/auth/ you should get to a page that says “logged in”
Next run the following command
shib-keygen
Edit the file /etc/shibboleth/shibboleth2.xml
change the line
<ApplicationDefaults entityID="https://sp.yourdomain.com/shibboleth"
to (IP address of your web server)
<ApplicationDefaults entityID="https://<Web Server IP Addres>/shibboleth"
In the same file change
<SSOentityID="https://idp.example.org/idp/shibboleth"
discoveryProtocol="SAMLDS"discoveryURL="https://ds.example.org/DS/WAYF">
SAML2 SAML1
</SSO>
to (the IP address of your Gluu server)
<SSOentityID="https://<Gluu Server IP Addres>/idp/shibboleth"
discoveryProtocol="SAMLDS">
SAML2 SAML1
</SSO>
In the same file find the following line
</ApplicationDefaults>
Before that tag add
<MetadataProvider type="XML" file="idp-metadata.xml"/>
Save your changes
Edit /etc/apache2/sites-available/sp.yourdomain.com.conf
Add the following above the </VirtualHost> line
<Location /Shibboleth.sso>
SetHandler shib
</Location>
Next run the following commands.
cd /etc/shibboleth
wget --no-check-certificate https://<Gluu Server IP Addres>/idp/shibboleth -O idp-metadata.xml
service shibd restart
service apache2 restart
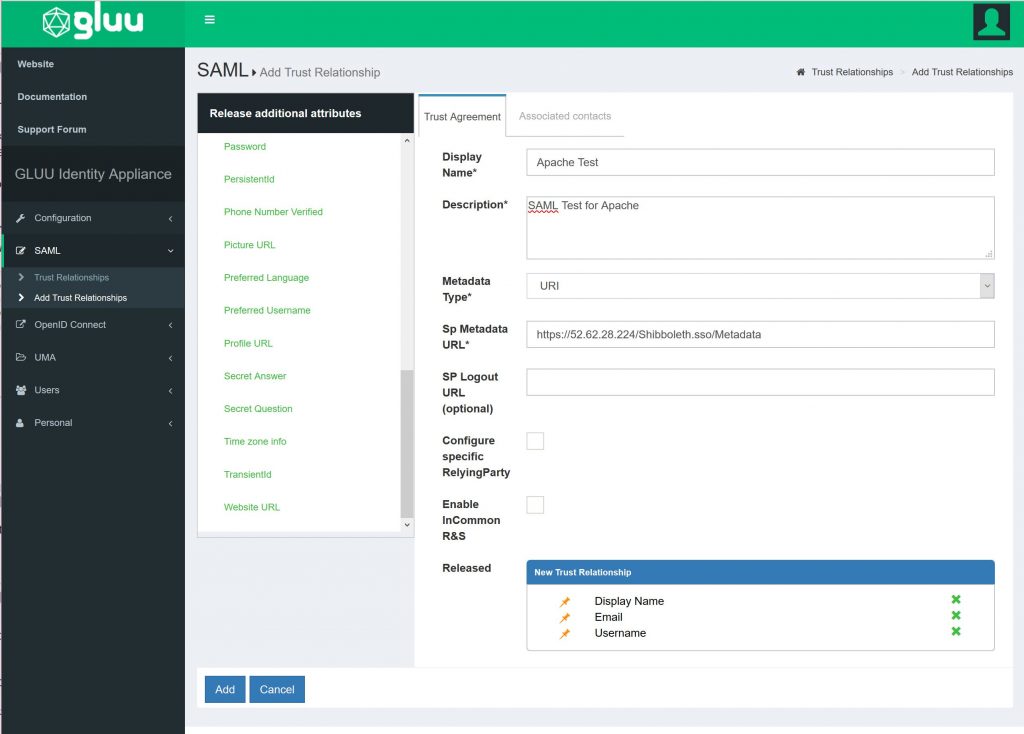
Next login to your Gluu server and in the left hand Menu select SAML->Add Trust Relationships.
Set the values as shown in the picture below. The Sp Metadata URL should use your web server IP address
The next step is to go back to the web server and edit /etc/apache2/sites-available/sp.yourdomain.com.conf
Add the following section to the file about the line </VirtualHost>
<Location /auth>
AuthType shibboleth
ShibRequireSession On
require valid-user
</Location>
Then restart Apache
service apache2 restart
Now when you go to the URL https://<Web server IP>/auth/ you should be redirected to Gluu for authentication before allowing access to the URL.
All the code, all the fun – Ben
