(Photo by Cecilla Heinen)
There’s no denying that the world of software development is becoming increasingly web-based. The Internet allows us to connect like never before.
I’m a new kid on the block at OptimalBI. I’m about to enter the fourth year of my Computer Science degree, and yet I came here with almost no knowledge on how to create software that interacts with the web.
After a few days’ worth of training and reviewing code, I was presented with my first programming task: a REST API for Sarah Habershon’s earthquake visualisation. The GeoNet API is a bit limited in some ways, particularly in that it can only provide you with the last 100 earthquakes that have occurred. If you’re from Wellington, Christchurch, or the recently hit Kaikoura, you’ll know that in one day, 100 quakes can be par for the course. Therefore I was to make a wrap-around API which would continuously save the last 100 quakes to a database, and spit out any number of quakes (filtered by date and magnitude) when asked to. This had me quaking in my boots (pun intended). In my mind, a Web API was the tango, and I was still tripping over my two left feet in the conga line.
Nevertheless, I put on my dancing shoes and found that the steps weren’t as complicated as they looked.
This blog gives an overview of some of the basics to help nervous dancers like me get started with a web API.
Picking a Language
For my API, I used C# with ASP.NET Core (a very new system), however, there was a lot of debate over whether I should use Node.js instead as it is a lot more mature. I ended up choosing ASP.NET as I have much more experience writing in C# than JavaScript, and I didn’t think I could handle any more new information being dumped on me. There are some other techy reasons for my choosing C#, but those belong in their own blog.
This blog will use C# and Visual Studio in its specific instructions, but the general concepts are pretty much the same.
Setting Up the Project
- Create a new project in Visual Studio via File > New > Project…
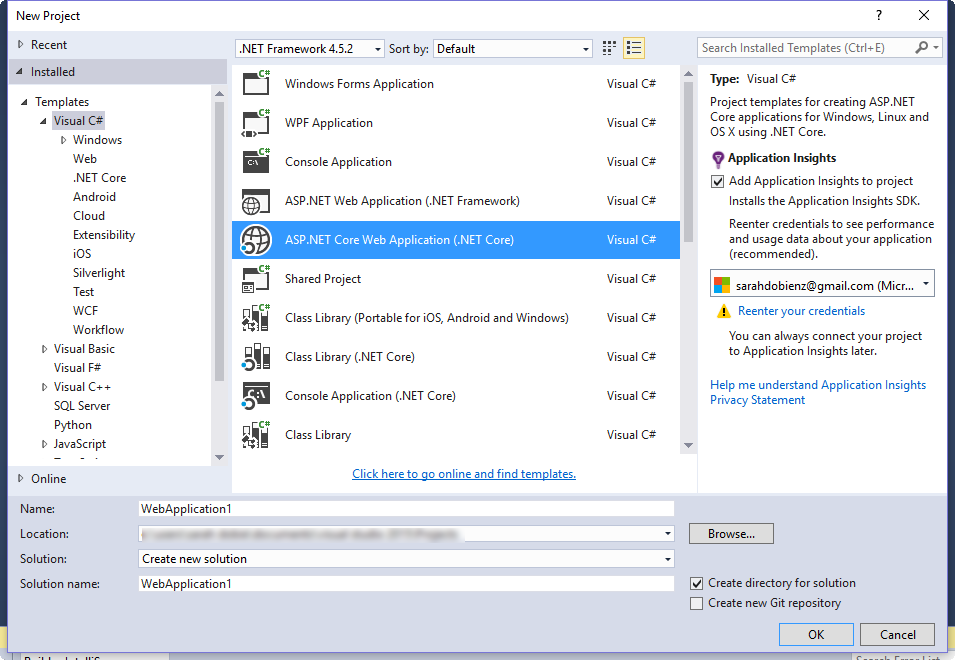
- Select ASP.NET Core Web Application (under Templates > Visual C#) and click OK.

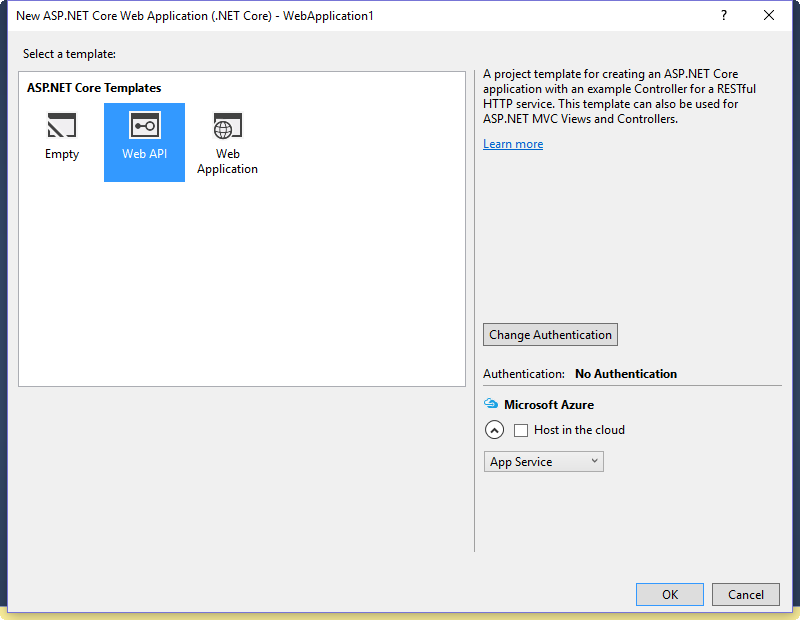
- Select Web API and continue.


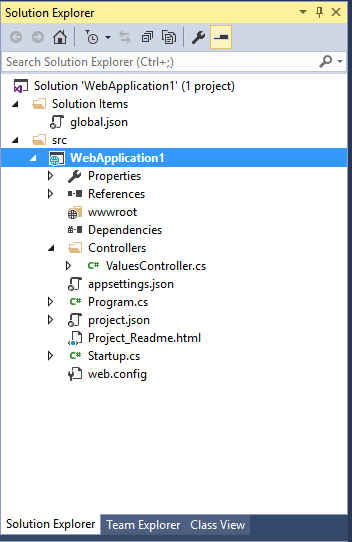
Fabulous! Now VS has set up all the necessary files for you.
For a simple API, we just need to worry about Program.cs and ControllersValuesController.cs. Program contains the Main method, where you can do any initialisation that needs sorting out. ValuesController though is the heart of the API. Let’s dissect it.
ValuesController
VS will have set up ValuesController with some sample code to help you get started. Let’s have a look at some of the lovely things it’s set up for us.
Route
Let’s start at the top of the class. This is where we set up the base part of our URL. APIs use URLs to call functions, so setting the URL is important.
[Route("api/[controller]")]
public class ValuesController : Controller {
...
Because we have [Route("api/, we add api to the base URL, so it starts with mywebsite.com/api/. Having [controller]")] means the name of the controller is also added to the URL. In this case, the controller is called ValuesController, so values is added to the URL, giving us mywebsite.com/api/values/ as our base URL. Any functions in this class will be called via a URL starting with this base one.
GET
Get is one of the most used API functions – this was certainly the case for me.
The Get function responds to a GET request from the user. The implication of this function is that data will be supplied to the user without affecting anything else. The user will access a particular URL (in this case mywebsite.com/api/values) which will trigger this function. Whatever Get returns is sent back to the user. Simple, right?
// GET api/values
[HttpGet]
public IEnumerable<string> Get() {
return new string[] {"value1", "value2"};
}
We can make this a little more useful by adding parameters. Say we want some information from the user to determine what response Get sends back. We can overload Get like this:
// GET api/values/5
[HttpGet("{id}")]
public string Get(int id) {
return "value: " + id;
}
With this code in the API, the user can go to mywebsite.com/api/values/5 to pass 5 to Get as the id argument. From here, Get can use this number however we like – in this case, it’s just printed out.
Say we’re using our API to return data from a database, and we want our user to be able to send queries and get the results. This isn’t in any of the skeleton methods Visual Studio has provided, but it’s something I used a lot for my earthquake API. Here’s a simplified version of a method I wrote to query earthquakes by date and magnitude:
[HttpGet("eq")]
public string Get([FromQuery] double minMag, [FromQuery] DateTime startDate,
[FromQuery] DateTime endDate) {
// Run query
return db.Query(minMag, startDate, endDate);
}
Note: [HttpGet("eq")] adds to the URL, so we access this method from mywebsite.com/api/values/eq.)
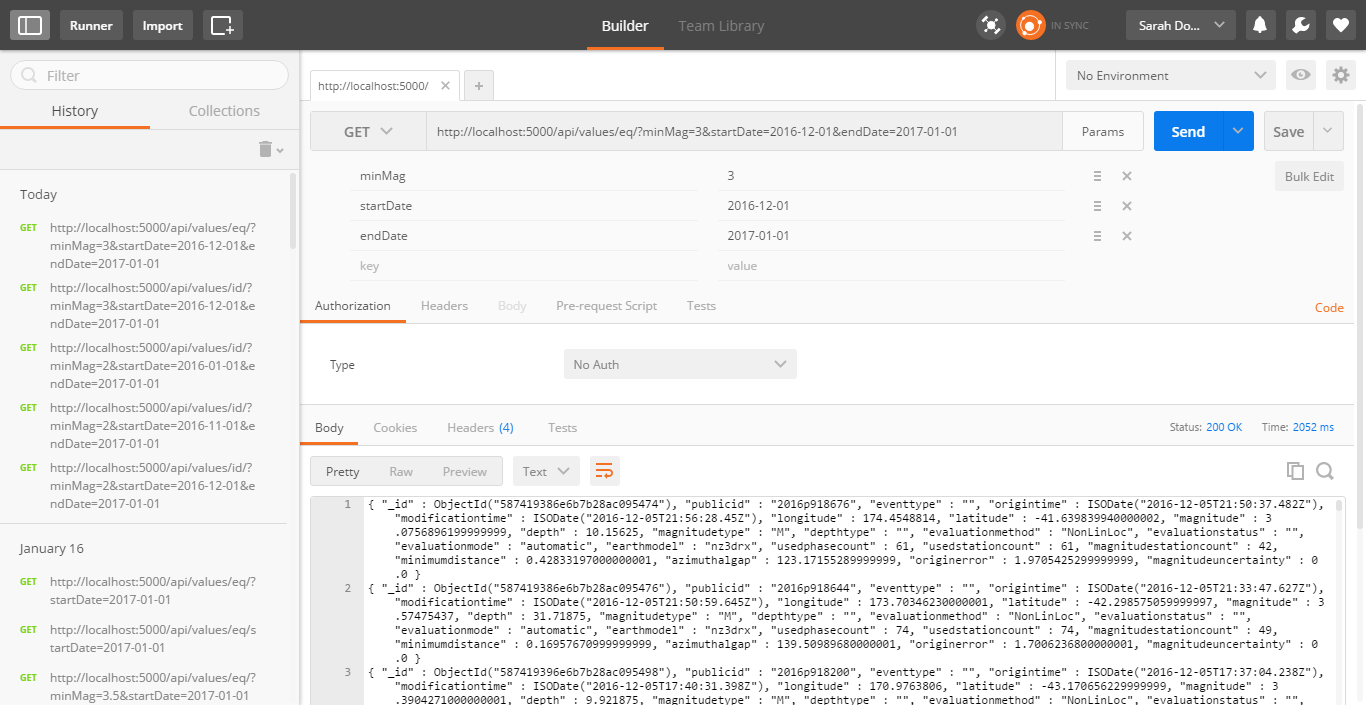
Prefixing the parameters with [FromQuery] turns them into query parameters. The user can call this method via mywebsite.com/api/values/eq/?minMag=3&startDate=2016-12-01&endDate=2017-01-01
Sidetrack: Building a Query URL
This style of URL will probably look familiar to you – web sites use them all the time. Even the WordPress page I am writing this post on is using this style!
- The URL will always start with the base URL (see Route), in this case, mywebsite.com/api/values/. The method we want to call has used [HttpGet("eq")], so we need start our query from mywebsite.com/api/values/eq/.
- To indicate that we are making a query, we add a question mark to the URL. mywebsite.com/api/values/eq/?.
- Now we list all the arguments for the query in the format param=value, separated by ampersands. For example, minMag=3&startDate=2016-12-01&endDate=2017-01-01.
- Smush it all together and boom! We have a beautiful URL: mywebsite.com/api/values/eq/?minMag=3&startDate=2016-12-01&endDate=2017-01-01.
POST
This command allows the user to pass a large amount of data to the API, with the implication that it will be added as a subordinate of the URL it was accessed from.
// POST api/values
[HttpPost]
public void Post([FromBody] string value) {}
Note: [FromBody] means that value is taken from the body of the request.
This method (as well as the ones mentioned below) can be accessed simply by accessing the URL, as we did in Get. This means, however, that different commands (Post, Get, Delete etc) cannot have identical parameters. (Otherwise, accessing a specific URL could have an ambiguous response.)
PUT
Put is similar to Post, except it implies storage of data at a specific address. If something already exists at that address, it should be modified. The sample function below could be used to allow the user to store a value against an id.
// PUT api/values/5
[HttpPut("{id}")]
public string Put(int id, [FromBody] string value) {}
DELETE
Does what it says on the tin. Pretty much the inverse of Put.
// PUT api/values/5
[HttpDelete("{id}")]
public string Delete(int id) {}
Others
Making an exhaustive list of HTTP commands with examples would make this a pretty uninteresting blog. Rest assured that there are plenty more of them, but the ones listed above are the most common.
Testing
It’s 2017. There is no need to test your API without a nice GUI to make your experience a bit cushier.
Postman is a great tool for testing an API. It has lots of features that will make your life easier. No need to type in complex URLs or worry so much about typos. Fun fact: it was recently rated as StackShare’s #2 Utility Tool of the Year.

The basic version is free and has everything you need and more to test a simple API.
Putting on Your Dancing Shoes
Just a disclaimer that I have never actually danced the tango and have no idea how hard it is. I hope my metaphor doesn’t offend any dedicated tangoers. But like the Argentinian dance, APIs were intimidating and foreign to me. It turns out that the basic steps aren’t so bad.
An API is just a series of specific methods accessed in specific ways. It’s not that different to any other simple program.
Like with any new skill, getting started is the hardest part. Hopefully, this blog will provide some aid in that. The world of the web is growing, and it’s something we need to embrace.
Put on your dancing shoes and get ready to tango with the web.
Sarah – The tea-drinking programmer

